
I’m often asked about my feather paintings. I’d say the top 3 questions I’m asked are ‘What made you paint on feathers?’, ‘How on earth do you do that?’ and ‘Where do you get your feathers from?’
If you know me or you’ve met me, you’ll know the answers, but for those of you who don’t, here’s a little insight into the 3rd and 4th questions…. I know, I only wrote 3, but the 4th always follows the 3rd and is… ‘what do you do to clean them?’
Every day, I go for a walk with my little dog, Chilli. We take a variety of routes across fields, along the coast, through woodland, over hills, down valleys… and more often than not, we find feathers! I pick them all up and pop them into the back pocket of my ‘bum-bag’ which I wear as it holds all the essentials needed for dog walking.
Its only a slim pocket, but you’d be amazed how many feathers fit in. Once every couple of months, I empty the pocket and the preparation process begins.
Step 1 Remove feathers from bum-bag and place in a plastic bag (which I reuse over and over again!) tie up the bag, squeezing out as much air as possible and place in the deep freeze for at least 48 hours. This will kill any mini beasties which may be living in the feathers.
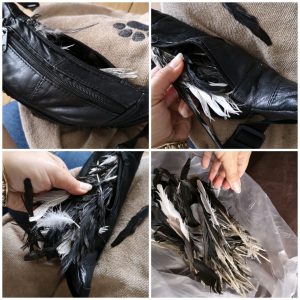

Step 2 Remove bag of feathers from the freezer and empty into a sink of warm, soapy water (I use shampoo because feathers are essentially the same as our hair) Give them a good swish around then pick them out of the water and squeeze out excess water.

Step 3 Drain the dirty soapy water, rinse the sink and re fill with clean, like warm water. Replace the soapy feathers into the clean water and swish around to rinse out the soap.
Step 4 This is the time consuming bit…but worth the effort! One at a time remove the feathers by the quill end, and when you have several in your hand, squeeze out excess water, then place the feathers on a towel to drain. Repeat this until all feathers are out of the water. I usually start with the biggest and work my way to the smallest.

Step 5 Now all the wet feathers are lined up in the towel, they can be wrapped and rolled and squeezed inside the towel to absorb excess moisture.
Step 6 At this point, the feathers can be laid out to dry on a dry towel (on a sunny day with no breeze!!) or they can be blown dry using a hairdryer. Which ever you choose, remember, the slightest breeze (or blast from a hairdryer will send feathers floating in all directions…!!!

Step 7 Dry feathers can be sorted (colour/size/species-ish) and carefully placed into airtight containers. I use ziplock food bags as they can be reused over and over again.
Step 8 Label the bags. I tend to label with the date and either ‘Frozen and Washed’ or Frozen, not washed’ or ‘washed not frozen’. When I’m lucky to receive a parcel of feathers in the post, I try to remember to write who sent them to me. Sometimes , if I’ve found a special feather, I’ll write that on the label too eg, ‘Jay Feather, Cadbury Hill’.
Ta Dah! Now you know!
Happy Feather Hunting!
